
Chasing the Golden Hour: The Traveler’s Guide to Landscape Photography
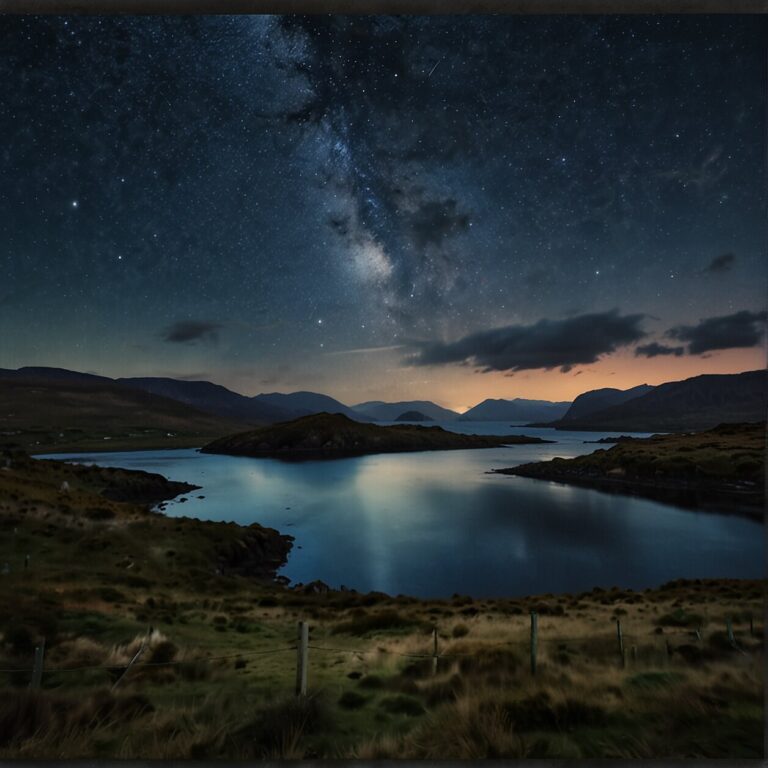
Imagine this: A landscape bathed in a mesmerizing glow that only a setting or rising sun can cast. Yes, that’s the magic of the golden hour – a fleeting window of time that can turn the most ordinary of scenes into a visual wonderland. As a photographer, leveraging the golden hour is a skill worth mastering. Not only does it provide unparalleled lighting conditions, but it can also lend an extraordinary depth and mood to your landscape photos. In this guide, you’ll learn the ins and outs of capturing landscapes during the golden hour. We’ll explore concepts around timing, composition, artistic elements, practical tips, and planning ahead, all aimed to help you maximize this enchanting period of the day. So let’s get started, and before you know it, you’ll be creating stunning photographs that truly stand out!
“Leveraging the golden hour is more than just understanding lighting; it’s about feeling the mood of the scene and capturing it in a way that the viewer can feel it too.”
- Timing: Understand what constitutes the ‘golden hour’ and how to calculate it
- Composition: Learn how to bring the landscape to life when bathed in golden light
- Artistic Elements: Employ the feel of the golden hue to inject mood into your captures
- Practical Tips: Acquaint yourself with useful techniques for handling the golden hour conditions
- Planning Ahead: Get insights into scouting your location beforehand in order to anticipate the best shots
Understanding the Mystique of the Golden Hour
The golden hour, otherwise known as magic hour, is precious to photographers for good reason. That unique period shortly after sunrise or right before sunset provides the natural canvas for some of the most mesmerizing landscape photographs. The question is, why are these moments so aesthetically captivating?
The answer lies in the science of light. During the golden hour, sunlight travels through a greater depth of atmosphere, scattering blue light and allowing red and yellow light to take dominance. This shift creates a soft, warm lighting effect that can add depth, drama, and dynamism to your landscape shots. Moreover, the long shadows cast by the low angle of the sun can help you introduce an element of mystique and complexity into your compositions.
The enchanting allure of the golden hour also comes from its fleeting nature. Each golden hour is unique and unrepeatable, offering a brief window of artistic opportunity that encourages spontaneous creativity. So, while it’s important to plan your shots, being in tune with the moment and letting the scene speak to you is crucial for golden hour photography.
Photographing during golden hour can require a shift in your mindset. Instead of seeing light as a tool for simply illuminating your subject, consider it as a profound ingredient in your composition. Observe its qualities, and learn to understand how it interacts with the landscape and your camera to unveil beauty in a breathtakingly new way.

Composing the Perfect Golden Hour Landscape Shot
So you’re ready to nail that perfect landscape shot during the golden hour. Remember, the magic is in the details. Let’s understand how we can craft that quintessential sun-kissed image.
First things first: it’s all about balance. You can start your composition by using the rule of thirds. Visualize your frame divided into 9 equal segments by 2 horizontal and 2 vertical lines. The rule suggests you should place the significant elements of your landscape along these lines, or their intersections. Doing this gives your photo a more balanced look, yielding an immediate sense of harmony and proportion.
Next, play with foreground interest. The warm, soft hues of the golden hour can create exquisite silhouettes. Position a captivating object, such as a towering tree or an irregularly shaped rock, in your foreground, and watch as they cast alluring long shadows that add depth and complexity to your scene. The soft, diffused lighting at this time will also lead to richer colors with less contrast, bringing out intricate details you might not usually see.
Don’t forget, where there’s light, there’s shadow. The dramatic, directional lighting of the golden hour will create long, intriguing shadows that you can use to add contrast and pique visual interest. Consider the orientation of the light and how it interacts with the various elements in your frame. With a bit of practice, you can start manipulating these shadows creatively, guiding the viewer’s eye towards the important parts of the image.
Ultimately, capturing the perfect golden hour landscape photo isn’t just about technique – it’s about embracing that special moment when day transitions into evening, or vice versa. So take your time, breathe in the scenery, and let your creativity take the lead.
Artistic Elements to Consider During the Golden Hour
When it comes to harnessing the golden hour for your landscape photography, the artistic elements you choose to incorporate can dramatically enhance the impact of your images. It’s not just a matter of snapping a photo, it’s about crafting a visual narrative. Let’s explore the main artistic elements you need to consider:
Light Direction
One key aspect you should consider, is the direction of light. Frontlighting may result in flat images during the rest of the day, but during the golden hour, the soft, warm, directional light can produce appealing lighting on a landscape. Backlighting, on the other hand, enhances the visual drama by illuminating edges and creating silhouettes or glow effects.
Shadow Length and Texture
The golden hour transforms shadows. In midday, shadows are often short and lack texture, but as the sun nears the horizon, shadows lengthen and textures grow noticeably richer. These crafted shadows can add depth, dimension, and intrigue to your photos.
Color Palette
This magical time is called “golden hour” for a reason. It bathes landscapes in warm and soft hues, casting long, painterly, and red-orange beams across the scene. By capturing this glow, your landscape shots will emanate a calm, pleasing atmosphere that can captivate viewers.
Use of Negative Space
The golden hour sky, with its vibrant colors and smooth gradients, is a perfect time to leverage the use of negative space. Negative space refers to the area that surrounds the subject of your photograph. It could be the sky, a body of water, or a simple background. It’s an artistic element that can naturally draw attention to your subject.
By keeping these elements at the forefront of your mind, you’ll be able to utilise the golden hour to produce stunning, powerful landscape photographs. Remember, photography is not only about what you see, but also how you see it. Experiment, express, and let your creative spirit shine as brightly as the golden hour itself.

Practical Golden Hour Photography Tips and Tricks
Embracing the sublime beauty of the golden hour can be a transformative experience, but getting those picture-perfect shots demands a combination of technical prowess, artistic insight, and a bit of savvy. Here are a few practical tips and tricks to help you capture the quintessential golden hour landscape images.
Opt for Manual Mode
Firstly, take control of your camera by switching to manual mode. Automatic settings often struggle with the dramatic contrasts and color tones known to the golden hour and might not accurately capture the scene as you see it.
Play with White Balance
Next, don’t depend on your camera’s auto white balance. The golden hour’s amber hues can confuse your camera, causing it to overcompensate leading to an image that’s too cool. Adjusting the white balance to match the warmth is a more effective way to retain the golden aura.
Brace for changes in Light Intensity
During the golden hour, light intensity can change drastically and very quickly, requiring constant adjustments to the camera’s settings. Be ready for this rapid shift and act quickly to adapt your settings, particularly the shutter speed and aperture.
Use a Tripod
A tripod can be immensely helpful during this time. The decreased light levels may require longer shutter speeds thus increasing the risk of camera shake. Counter this with a sturdy tripod that will also free you up to consider your composition more carefully.
Go RAW
Finally, shoot in RAW format. RAW captures more data than JPEG, allowing greater flexibility in post-production adjustments. This can be particularly useful in golden hour photography, where rescuing details in shadows or controlling very bright highlights may be necessary during post-processing.
Applying these action-oriented tips and tricks in your next golden hour photo session is a surefire way to elevate your landscape photos and bring your vision to life.
Planning Ahead: Scouting Locations for Golden Hour Photography
Scouting your location is a task that should never be trivialized when planning golden hour photography. This pre-shoot step allows you to discover the best spots to capture and maximize the wonder of the golden hour. The exact moments when day turns into night or night into day are fleeting, so knowing where you’ll be and what you’re looking at ahead of time is crucial to snapping that magical shot.
Start off by visiting your chosen location at different times of the day. Take note of how the sunlight hits various spots and identify which areas offer the best views. Equip yourself with some useful apps that inform you of the times for sunrise and sunset and the direction of the sun during these periods. This knowledge will enable you to determine the most crucial factor of your shoot – where the sun will be in relation to your subject at the time of the golden hour.
It’s also worthwhile to consider the weather forecast. Even the most meticulously planned golden hour shoot can be thwarted by overcast skies or other unfavorable weather conditions. Be sure to have a few backup locations in mind, in case your first choice location becomes unusable due to unforeseeable reasons.
Finally, while scouting, you might want to take some test shots. This way, you get a rough idea of how the actual shots might come out during the golden hour. These shots could also help you decide the best camera angles, focal points, and compositions to use during your golden hour landscape photography.
Remember, the aim is to be fully prepared to capture nature’s fleeting masterpiece during the golden hour. A well-scouted location gives you that superb composition and leads towards an artfully crafted image. So, take the time to plan and scout, your amazing golden hour landscape shots will undoubtedly thank you for it.
FAQ’S
Welcome to the beautiful world of golden hour landscape photography! This article provides an in-depth exploration of how to best utilize this magical time of day to create breathtaking photographs. From understanding the mystique of the golden hour, to mastering the composition of a perfect landscape shot, we cover it all. Learn about the artistic elements you should consider during the golden hour, practical tips, and tricks for golden hour photography, how to scout your locations, and much more. We’ve also answered some of the frequently asked questions to guide you through your journey. Let’s discover how you can transform your landscape photos from ordinary to extraordinary!
What is the golden hour in photography?
The golden hour in photography refers to a brief period shortly after sunrise or just before sunset. During this window of time, the sunlight is softer, diffused, and often imparts a warm hue. This creates a magical lighting that produces dreamy and ethereal images.
Characterized by its distinctive warm, golden tones, the golden hour lends an element of drama and moodiness to photographs that can imbue them with a sense of power and emotion, often associated with nostalgia or sentimentality. It offers photographers the chance to create stunning visuals that stand out and leave a lasting impression.
The exact duration and timing of the golden hour can change based on geographical location, time of year, and weather conditions. In general, though, it lasts for about an hour after sunrise and an hour before sunset. However, in certain regions or times of the year, it can be significantly shorter or longer.
How can I use the golden hour to improve my landscape photos?
Sure, golden hour can dramatically enhance your landscape photos by creating a warm, soft lighting effect. However, it’s not just about being at the right place at the right time, this magic hour requires strategic application for maximum impact. Here’s how you can make the most out of this special hour in photography.
Focus on Lighting
Golden hour provides a unique, warm lighting that’s diffused and directional. This results in long shadows and brings textures to the forefront, enhancing the depth and dimensions in your landscape photographs. Experiment with direct or side lighting and notice how the landscape transforms under different angles. This warming effect of the sunlight will give your landscapes a depth and vibrancy that’s not present at other times of the day.
Capture the Golden Textures
The golden hour doesn’t just accentuate colors, but textures as well. The low angle of the sun results in shadows that bring out the texture on surfaces and highlights the topography of your landscape. This adds layers to your image, creating a more enticing visual narrative. Whether it’s the rough terrain, flowing water, or foliage, capturing these textures will provide an added richness to your photos.
Incorporate Silhouettes
One of the best ways to use golden hour lighting is by silhouetting. As the sun resides lower in the sky, forms take shape in darkness against the vivid backdrop. This dramatic contrast between light and shadow can lead to some incredibly atmospheric and striking images. Remember, silhouettes are all about shapes, so choose elements that have a clearly defined and recognizable form.
Don’t Ignore the Sky
The sky during the golden hour can be a canvas of colors and drama. From pastel hues to fiery reds and oranges, the skies can add a vivid backdrop to your landscape images. Look for cloud patterns and shapes to add more depth and emotion to your photos. Also, don’t forget to play around with your composition, the horizon doesn’t always have to be centered, sometimes skewing it can add to the dynamism of the image.
Create Visual Balance
As with any image, balance is important. Use the rule of thirds, leading lines, or natural frames to create compelling compositions. Let everything in your frame serve a purpose. The play of light and shadows, array of colors, and a careful composition can all come together to create stunning landscape photographs during the golden hour.
What techniques can enhance my landscape photos during the golden hour?
There are several techniques to escalate your golden hour landscape photos to the next level. Let’s discuss some of these:
Frame the Sun
One way of using the gold-hued light is to frame the sun, either completely or partially. The disc of the sun can be a powerful focal point, and when partially obscured behind an object (like a tree or a mountain), can create wonderful light rays and a sense of depth.
Use Reflective Surfaces
Water bodies or surfaces with reflective properties can further enhance the effect of the golden light. Lakes, rivers, or even wet sand can reflect the golden hour glow, doubling your opportunity for capturing beautiful light.
Highlight Texture
Golden hour is the perfect time to highlight textures because the directional light creates long shadows. This can give a three-dimensional feel to your landscape photos. Pay attention to surfaces like rocks, fields, tree bark, or even architectural elements.
Include Silhouettes
If you photograph towards the sun during the golden hour, it may result in silhouettes. This technique can create high-contrast, dramatic images with distinct shapes and a storytelling element.
Flare and Starbursts
When photographing directly into the sun, the camera captures the flares from the intense light. This can add a magical, dreamy effect to your pictures. Also, by using a narrow aperture like f/16 or f/22, you can transform the sun into a starburst, adding a special effect to the scene.
Leveraging these techniques during the golden hour will enhance your landscape photography skills, making your pictures stand out with striking tones and an enchanting aura. Don’t be afraid to experiment and find which techniques work best for your personal style.
What equipment do I need for golden hour landscape photography?
The right equipment can significantly enhance the quality of your golden hour landscape photography. Whether you’re a seasoned professional or a novice, there are a few essential pieces of kit you should invest in to leverage the golden hour to its highest potential.
Firstly, a camera with interchangeable lenses is a must. This gives you the flexibility to capture landscapes at various distances and levels of detail. Wide-angle lenses can help you capture sweeping vista shots, whereas telephoto lenses are perfect for zooming in on specific sections of the landscape.
Speaking of lenses, a lens hood is another important item to keep in your bag. This will help prevent lens flare or haze from the low sun, keeping your images crisp and clear.
Filters can also be incredibly beneficial during the golden hour. A polarizing filter can help boost the colors in the sky, and a gradual neutral density filter can balance out the light between the sky and the land.
To provide stability and ensure sharp images, a sturdy tripod is indispensable. As the sunlight can change rapidly during this time, a tripod allows you to keep your composition while adjusting your settings for the evolving light conditions.
Finally, consider having a remote shutter release. It allows you to click a picture without directly touching the camera, preventing any camera shake that might blur your image.
Remember, the golden hour is all about capturing the exquisite light, and the right equipment can help you do that effectively.
What’s the best way to prepare for a golden hour photography session?
Being prepared for your golden hour session is crucial to capturing the magic of this fleeting moment. Preparation should involve a combination of scouting, planning, and equipment check.
First, familiarize yourself with the location—this includes identifying potential compositional frames, understanding the movement of the sun across the landscape at your chosen venue and predicting how shadows may cast during the golden hour. Doing this provides clarity on the best spots and angles for shooting. Don’t hesitate to revisit the location multiple times before your planned shoot to get a clearer picture.
Track the Sun’s Movement
Use online tools and apps that track the sun’s position throughout the day – such as the Photographer’s Ephemeris or PhotoPills. These apps can indicate the timing and direction of sunrise or sunset at your location, helping you to plan your shoot more efficiently.
Check the Weather
The weather can greatly influence the quality of light during the golden hour. Hence, keeping an eagle eye on the weather forecast is key. Ideally, partially cloudy conditions can create a dramatic effect as the sunlight filters through the clouds. But, even if the weather isn’t ideal, don’t get disheartened. Often, unpredictable weather conditions can result in surprisingly beautiful images.
Test Your Gear
You don’t want to miss that perfect shot because your camera battery died or there’s an issue with your lens. Double-check your equipment before leaving for the shoot. This includes your main camera, backup camera, lenses, memory cards, batteries, tripods, and even lens cleaners. After all, it’s always better to be over-prepared than to regret later.
In summary, don’t leave your golden hour landscape photography to chance. Invest time in pre-planning and proper equipment check. As they say “luck favors the prepared.” So, get ready to capture that magic light!